
How to Create Profitable Facebook Lookalike Audiences
Written by Rod Bland on Oct 30th 2021 - 3 min read, 10 min video
Creating a Facebook lookalike audience is a great way to get cold traffic from people who haven’t heard of your business. But if you really want to see results, you must make sure it’s being done correctly. Here’s how to get started!
To learn how to create the best lookalike audience, click play on the video above, watch it on YouTube, or keep reading below.
Method for Facebook Pixel Users or Long-Time Facebook Ads Users
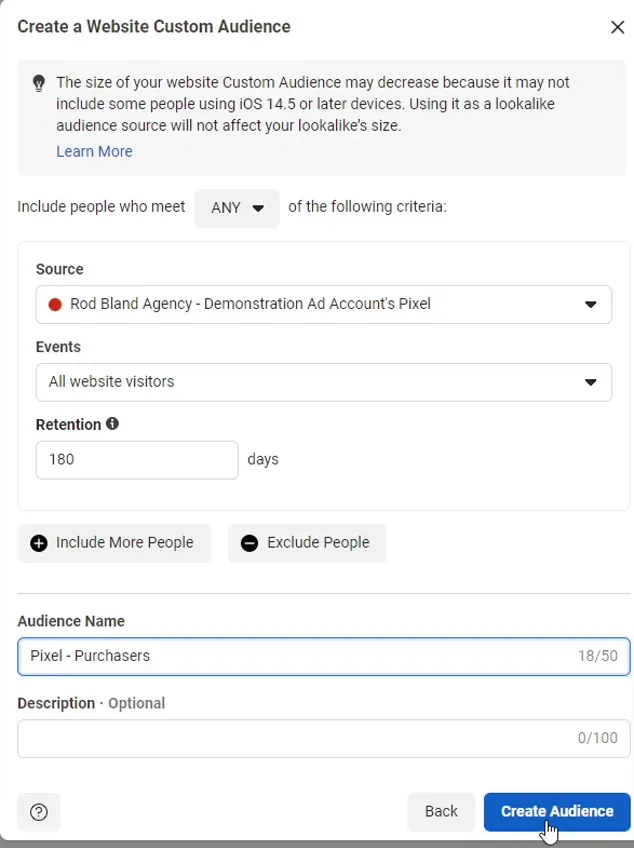
When you want to create a Facebook lookalike audience, the first step you must take is setting up your source audience. To do this, you’ll have to go into your Facebook ads manager and click on the icon that looks like a hamburger, then click on the Audiences icon.

Then select the option to create a Custom Audience.

No matter what, you want the source to be your real customers. You will have the option of adding an event which should be a purchase event if it’s available. The maximum amount of time you can use for retention is 180 days. Go for the maximum! Finally, name your audience and click “create.” You will now have a custom audience.
Now to create a lookalike audience, you’ll want to select your brand new custom audience and click “create lookalike” from the actions list. For your audience location, just choose whatever region you’re in, such as Australia if you’re in Australia.

You’ll also have to choose a size for your audience. To maximize the effectiveness of your lookalike audience, you really don’t want any less than 500,000 unless your budget is extremely tight. Even if your budget is on the smaller side, you still want an audience higher than 500,000 to see good results. With our Australia example, 3% of the population (over 650,000) would be a great number. Once you’ve clicked “create”, you now have your lookalike audience.

Method for New Pixel Users
On the other hand, if you haven’t been using Facebook ads for very long or if you don’t have the Facebook Pixel installed, the first method won’t work for you. Luckily, you still have options! You probably have a list of customers in some other format such as a CSV or Excel which you can use to create your lookalike audience.
Like with the first method, start by going to create a custom audience. This time, you’ll choose “customer list” as your source. You can add that list in a few ways, such as by importing from Mailchimp. Keep in mind this list won’t update when more people are added to that list unless you make some changes which we’ll discuss later.

If you want, you can choose a file with your customer value in it. This is how much customers have purchased from your business in monetary terms. You’ll have the option of pasting customer values into the text box with each one separated by commas. This is ideal if you have just a small number of them. If you have more, you can upload a CSV file. Although there will be several fields that you have the option to activate, we find that just including the email field only results in the largest number of matches with actual Facebook users.

The biggest benefit of the file upload method is that you aren’t limited by how far back in time you can go with your customers. With the Facebook Pixel method, as of when this article was written, you can only go back 180 days. With a file, you can include customers that you’ve had for many years.
Now that you have your custom audience built, you can once again go to actions and select “create lookalike.” Like with the previous method, 3% of your region’s population is a great selection for audience size. Now you’ll have your lookalike audience!

How to Automate Updating Your Audiences
Hopefully, your lookalike audience will continue growing long after you’ve created it. To keep it up to date with fresh data, you’ll once again have two options. When you go to edit your audience, you can add or remove customers as well as replace them. This is the manual method.

If you want to save time, it is possible to automate the updates. If you have an email service provider (ESP) like Klaviyo, synchronizing the email list or segment with your Facebook’s custom audience as more people join the list is easy and automatic. But there are other methods even if your ESP doesn't have a built-in Facebook custom audience integration.
Using Zapier to Synchronise a Mailchimp Audience with Facebook
You can use Zapier to automatically update your Facebook audience using your Mailchimp audience as the source. In Zapier, you want to click “create a Zap” and search for Mailchimp in the “app event” field.

Keep in mind the process is similar for other ESPs. Your trigger event should be when you get a new subscriber. Zapier will then prompt you to choose your MailChimp account. If you haven’t already connected the account, you’ll have to do that now.

Now your set up trigger should be the audience within Mailchimp. Once you’ve clicked “continue.” you can test the trigger which will allow you to pull some sample data from the Mailchimp list. As long as it looks correct, you can continue.
When you’re prompted to choose an app event for the action, you’ll want to select Facebook custom audiences, but first, you’ll have to create a custom audience by clicking “Create Custom Audience” and “continue.”

Now choose the Facebook account where you want to create your audience and click “continue.” Finally, name the audience. Then you can click “test and continue.” This will create an empty custom audience for you in Facebook.
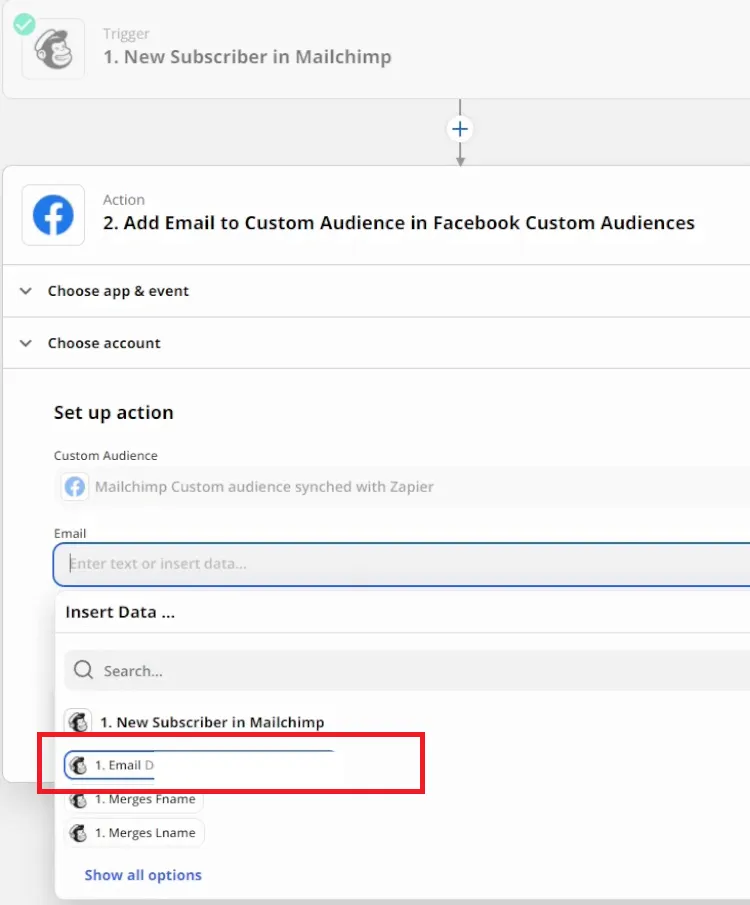
Next, you’ll need to go back and change the action event. You want to make it “add email to custom audience.” After you’ve hit “continue,” choose the Facebook account and select your newly created custom audience. Note, you must create your custom audience first or you’ll get an error message before you get to the final step.

After choosing your new custom audience, select the right email field.
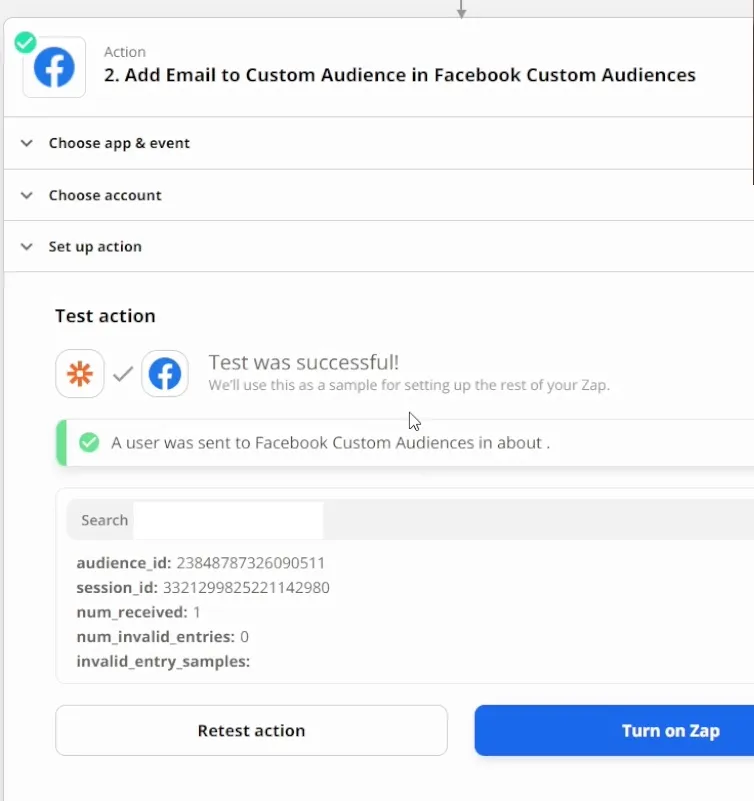
Once you have chosen the right email field, you can test the action. As long as it’s successful, you can turn on the Zap and you’re done!
Run a Successful Ad Campaign with the Help of Rod Bland Agency
When you follow this step-by-step guide, you’ll have at least one lookalike audience on your Facebook account for your ads. Of course, there’s much more to running a successful ad campaign than simply creating a lookalike audience. This is exactly what we help with at Rod Bland Agency! If you’d like to chat with someone on the team, you can book a call directly in our calendar. We look forward to getting to know your business!
Connect With Rod
Regular updates with tutorials and advice for better business results

YouTube
In-depth video training

Training videos, advice, tips, tricks and community
Sign up to receive growth hacks, advertising strategies and tactics